Post Top Ad

Post Top Ad

Showing posts with label photography tips for beginners. Show all posts

3 Feb 2017

05:44

Do we need expensive lenses and camera for good photographs

Is it true that you need expensive lenses and high-end camera to take good photographs? Hmm.
I am sharing some photograph below, these photographs were taken 4 years back when started photography with my first entry level camera Nikon D5100 and 18–55mm lens.
Wheat grain

Thunder and Lightning

Thunder, lightning and cloud

lightning strikes tall water tank


Waterfall

Ans-1- Yes, if you are doing some high-end commercial project then you definitely need one to deliver the desired quality.
Ans-2: No, if you are planning on taking just good quality photographs on your vacation, go with any canon or Nikon entry level DSLR. But not point and shoot.
You need to understand that why any expensive lens or camera are so expensive? It’s expensive because it enables you to work on details and when you are working professionally on some project, detail is the first priority. Every lens is made for some specific task to perform, that’s why we photographers keep 2 or 3 lenses handy always while doing any project. but in case you just need to capture your vacation where you’d take some portraits of your girlfriend (I assumed you are going with your girlfriend), some beautiful landscape or sometime if you feel very creative, you’d want to take some nightscapes and long exposure photographs. Believe me, for all of these you don’t need any high-end camera or expensive lens, any entry level camera with kit lens would also work for you.
Why buying the expensive camera and gears shouldn't bother you? I have discussed this in detail in my e-book that can be downloaded from my website, www.orenzweb.com 

7 Jun 2013

12:12

How to edit an under exposed picture in LIGHTROOM

Train passing through Jungle

You have the Second opportunity
Whenever I share my photographs with someone, often I get this reaction "O my god! it's looking beautiful, is this edited? and I just smile. Obviously, every photograph needs little or more color correction and finishing touch, that doesn't mean this is not originally beautiful photograph and my editing make it beautiful. But this time I won't just smile, I admit,   the above photograph, I am sharing this article is edited. How? that is the real experience should be talking about. And also I realise the second opportunity.
Whenever we talk about photography, we discuss right exposure, ISO, shutter speed, Aperture etc, etc… and forget about the second most important part which I called the second opportunity in photography, we just try hard to take picture in right exposure settings often succeed but what if you miss the chance and what if you took a very good photograph in bad or wrong exposure, no problem, we have another chance to correct it on your editing table in post production process.
Yes, you are right, editing and that is the second opportunity in photography I am talking about.
-->

Sounds so Simple?
Every thing seems to be very simple, yes I know any photograph needs a finishing touch but here I am talking about the photograph with a bad exposure and making it extraordinary image, on our editing table with some tricks.

You’d think why I should bother about editing rather I’ll make sure, my camera exposure setting is right. Yes you are right, I also thought like you, until I clicked this image and edit it on my computer. Just think, we take loads of photographs and at the end of the day we have thousand of photographs looking nice on our camera screen, but when we go to the editing table, we delete 100s photographs after every photo shoot, because they are not reaching our expectation. In photography it is said that we have to be as lucky as skilled.
So luckily you have some good photographs but exposure is extremely bad, almost black as you can see in the given image, what you’d do? Yes this is very frustrating. But here is your second opportunity. I think we should not delete the photos blindly, may be there is some photographs which can be edited and who knows it could be your photo of the day. So picking that photo, from your all thousand photographs, is obviously not simple.

Playing with editing tools:
slider setting lightroomWhen I was on assignment to cover Indian festival ‘Holi’ I just clicked this image accidentally while traveling, without bother about exposure and almost forgot about this image and after finished my assignment, I started post production process, this was looking horrible when saw this photo on my computer screen  and the first word came into my mind was ‘waste’, but at the same time I liked the composition very much, the way train moving in the image and I noticed there was no disturbing element like electric wires and poles present there, I felt like this was the man made marvel in between the beautiful god made nature. But the lighting was as poor as you can see in the original image. Normally I delete the bad images immediately but that day I decided to repair this image and started paying with tools. After some experiment and adjustment, got this result you can see in second edited photo.
So when I completed my work it was a great feeling to see this image in large view on my computer.

How I edited this image:
When I was editing this image, one thing that I was clear about was, I don’t have to aggravate with the originality of the image. I was just trying to enhance the image, not only this time but I always do the same.
Which software is used? I love both, the Adobe Photoshop and Adobe Photoshop Lightroom equally. For this image, I used  Adobe Photoshop Lightroom and Photoshop as well.

hue, saturation lightroomFirst I tried to fill light with the fill light tool and increased it until it looks clear. You can see in the image it is about 85, I also increase little bit exposure up to +0.80. I used some negative tint to enhance sky color.

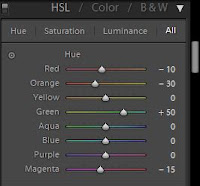
Then I adjust the Hue, luminance and saturation (HLS) until it looks good as you can see the given reference image. These are the basic tools I played with and give this ordinary damaged photograph a Wao factor.
If you think any another photo editing software like Photoshop can more enhance your photograph, don't hesitate to use it.


Quick Note:
  • Be careful while you are sorting your best photographs, because still we have second opportunity on your editing table.
  • Play with the editing tool whenever you get time, experiment with your bad photographs before deleting.
  • Try not to manipulate image, enhance the photographs but not at the cost of originality. (All depends on the situation and type of photograph).

19 May 2013

23:01

What is Bokeh-Beginners


bokeh f/5.6
What is Bokeh?
Bokeh is a Japanese word 'boke' which means Blur. In photography when we shoot with any fast lens and create an effect of soft out of focus background in back of your subject which also looks pleasing and aesthetically beautiful.

Nikon 50mm f/1.8G AF-S NIKKOR FX Lens for Nikon Digital SLR Cameras

How to Create Bokeh?

Creating bokeh is as simple as dressing your hair, all you need to know the style you want to create. Any fast lens is okay to create bokeh. The faster the lens the better the result. You can use a lens with an aperture at least f/5.6, but talking an ideal, it's good to use 50mm, f/2.8 or faster like f/1.8, f/1.4. if you are rich enough to buy multiple fast lenses its good, but if you don't own faster lens, there's no need to worry. In fact, even your kit lens is capable enough to create beautiful aesthetic quality bokeh. While taking bokeh photograph try to increase the distance between your subject and the background and decrease the distance between your camera and the subject as much possible as your camera minimum focus distance allowed you. The more the distance between the subject and background the more out of focus it will be and you ll get better results. A simple portrait with a high depth of field is also a good example of a Bokeh. You can use this technique in various style photography.


Enter your email address:


Delivered by FeedBurner

11 Apr 2013

02:22

What is ISO


flower
Image with 2 different ISO setting
ISO in digital cameras indicates how much sensitive the sensor is, to the light. There are different values for ISO in your digital cameras i.e. ISO 100, 200, 400, 800, 1600, 3200, 6400 and more. If you choose higher value, the sensor will be more sensitive to light and produce more grains in the image and if less value chosen, the sensor will be less sensitive to the light and produce high quality image without grains. For example ISO 6400 will produce more grains than ISO 100 as shown in the given Picture.
High ISO values allow you to shoot with fast shutter speed to achieve optimal exposure with given aperture. High ISO also allows you to shoot under low light, but at the same time it also produce grainy image and reduces the quality of your image. Low ISO setting produces high quality images but limit the use of higher shutter speed. Choosing ISO value is all depends on under which circumstances you are photographing and how much you can compromise with the quality of your image. 
In the above Image, you can see clear grains  photograph at high ISO setting i,e. ISO 6400 while the another image ISO 100 have no grains and have better quality. The shutter speed for the Image ISO 100 and ISO 6400 was 1/160 and 1/25 respectively.


8 Apr 2013

03:11

Shutter Speed


water
Shutter speed 1/2000

Camera shutter speed is the duration of time that the shutter remains open and allow light to fall on the sensor. The longer the shutter opens the more light reach the image sensor. It also you can also use it interestingly, if shutter speed is fast, it can freeze the action and requires more light from other source like aperture, because faster shutter speed can not allow more light to reach the sensor, requires wide aperture or high ISO number to equalize the exposure. For example you want to capture some sports action like basket ball and you set the shutter speed as fast as 1/1000 sec, now make sure that you set wide aperture like f/1.4 or f/2.8 or according to whatever the light condition allow you, (we’ll discuss on how to set right exposure in our later post) but now we wont discuss on exposure so lets stick with the topic. Again if shutter speed is slow, it can smooth the moving subject like water but don’t expect to capture any action in slow shutter speed setting. If you are using manual mode, this feature can create magic, depends on how creatively you use this feature. If you want to make shutter opening and closing manually, use bulb mode.

Points to Remember:
1.     To freeze fast action (basket ball match, bike riding etc.) start with 1/800 or 1/1000 sec.
2.     For portraits and regular photos use at least 1/200 sec.
3.     Low shutter speed allows photography in bad light condition.
4.     Fast shutter speed needs larger aperture (smaller f-stops number)
5.     Slow shutter allow smaller aperture (larger f-stops number)
Enter your email address:


Delivered by FeedBurner

6 Apr 2013

07:49

Learning Camera Aperture (f-Stops) :Explained

Aperture diagram
ABA Creation Diagram: f-stop opening
Aperture is the size of the opening on the lens mouth, allow light to enter the camera. The larger the f-stop number, smaller the aperture opening. For example- f/5.6 or f/8 means larger opening than f/11 or f/14. Please refer the diagram.


Let’s make this simpler.We can say this, it works on the same principle on which our eye does. The larger the opening the more

the light enters and vice versa. If you want to see how it works just stand in the front of the mirror with a torch in your hand, light the torch direct in your eyes, now slowly get the torch off your eyes and towards your eyes. What happens? The pupil of your eye shrinks small to control the amount of light enters into your eye, when you get torchlight directly into your eyes and when you remove torch off your eyes the pupil shrink large to allow more light to enter. The same thing happens with your camera and when you use manual mode you control this yourself.

How Aperture works?

Actually, the question is how you want it to? everything depends on the type of photograph you want to capture. If you are photographing landscapes(pic-1), you need to set larger f-stop number(smaller aperture opening) and while taking closeups you may need to set smaller f-stop number(larger aperture opening). This is called depth of field(we'll discuss this topic in our later post). If you want your subject to be in focus and everything out of focus(pic-2), then you must set smaller f-stop number(larger aperture opening), and if you want to make everything in focus then set larger f-stop number(smaller aperture opening).
Tree
Pic-1
Shutter 1/125,APERTURE f/11 ISO-100 
In pic-1 I need short depth of field and want everything the background and foreground in focus, so I set the aperture f/11, actually when taking a landscape photo, it good to be above f/11, though f/11 worked for me here. You can set the aperture at f/14 and above.
Wheat grain
 Pic-2
  Shutter 1/250,APERTURE f/5.6 ISO-100
In Pic-2 you can see the foreground and background are out of focus and extra depth of field is used.You can achieve this result with smaller f-stop number (larger aperture opening). I use f/5.6 but don't hesitate to go with more smaller f-stop number(larger aperture),f/1.4 or f/2.8 can also create magic.
There is no hard and fast rule, just believe in yourself and do what suits you. All will comes with practice, the best way to learn anything.

Enter your email address:


Delivered by FeedBurner
07:26

What is Exposure:-xplained

Camera dial
In digital cameras, exposure means the amount of light enters in the camera that reaches the camera sensor to make an image. When you turn off your Auto mode and use manual mode this is very important to know how the things work. Now the question is how light enters in the camera and how it can be controlled.

Following are the three things responsible for the exposure.

Aperture (f-stops)-Size of the opening of the lens, through which light enters in the camera
Shutter speed-Duration of the time that shutter is open
ISO-Sensor sensitivity to the Light.


You can control these features to control the amount of light enters in your camera. To control exposure (Shutter speed, Aperture, and ISO) and set the right exposure for your camera is not easy, the only thing you can do is practice, practice, and practice. We have to continuously increase and decrease the numbers until we get the right exposure. If you allow more light to enter the camera, the image can be overexposed or if allow less light to enter the image can be underexposed but you can also use this feature to show some creativity (we’ll discuss this in our later post).I found this book Basic Studio Lighting: The Photographer's Complete Guide to Professional Techniques very helpful for the lightning tutorial. In this book, you can master the lighting techniques step by step and learn the control over Shutter speed, Aperture, and ISO. Tell us how we can improve this article or what more expect from ABA Creation

Enter your email address:


Delivered by FeedBurner

5 Apr 2013

01:16

Shutter priority,Aperture priority,Program and Manual mode explained

What is this M A S P on my camera? What is this Av Tv? How is this useful to me? Lots of question in your mind and the answer is here. Now its time to turn off your Auto mode and make decision by yourself. On most digital cameras you’ll find a variety of exposure modes, typically referred to as:
camera
pic 01

• Aperture priority AE (Av)
• shutter priority AE (Tv)
• Program AE (P)
• Manual (M)

Obviously the entire above mode has their own function and particular use. It’s important to understand when to switch to these exposure modes lets explain each of these separately to understand their functionality when to use.

Hot Camera Equipments


1. Aperture Priority Mode:
As the name indicates, it’s all about your priority and if your priority is to control only aperture then set this mode. The aperture priority mode enables you to set the f-stop (Aperture) and the camera will then adjust the shutter Speed to give the correct exposure. In other words you just set the aperture and forget about the shutter speed, camera will look after that.

Dragonfly
Photograph by Abhishek Anand
f/5.6, Exposure time 1/200, ISO/200, 55mm AV mode

When to Use: This mode is particularly useful in low-light conditions, where you want to set the brightest, widest f-stop in order to get the highest shutter speed and the minimum amount of movement. When want to blur the background of foreground or in other words, more depth of field is needed, you can use a small f-stop to get as much of your picture in focus as possible. I also use this mode when photographing landscapes and nature, where continuously I need to change f-stops too continuously. For example when I photograph any landscape I need to change f-stops from f-5.6 to f-14 or f-16 and vice-versa when taking close-ups.


2. Shutter priority AE (Tv): 
Again it’s all about your priority and if your priority is to control Shutter speed then just set this mode. Using the shutter priority mode, you can set the shutter speed, and the camera selects the f-stop (aperture) to give the correct exposure.
Fast shutter
Photograph by Abhishek Anand
f/10 Exposure time 1/200, ISO/4000, 18mm Tv mode
When to Use: This can be especially useful when you’re shooting action pictures like sports and wildlife action and you want to freeze the motion by setting a high shutter speed. By the same token, if you were photographing a waterfall and you wanted the water to blur, you could set a slow shutter speed and the aperture would adjust accordingly. It goes without saying that both modes assume you have enough light to expose your pictures within the range of shutter speeds and apertures you’re using.

3. Program AE (P): This setting leaves all the decision-making to the camera. The camera sets a combination of shutter speed and aperture so you don’t have to think about exposure at all.

When to Use: Personally I never use this mode and in my personal opinion this mode can be rarely choose in any condition of photography (may be this opinion would be change in future) but In some cameras this may be set up as subject programs such as “portrait,” “sports,” or “landscape.” Be careful though. If there’s not enough (or too much) light to achieve the effect you’re after, your camera won’t be able to work miracles. Even on this setting, check the LCD to make sure you are getting the images you want. And remember that you can still use auto exposure compensation to override the camera’s decision.

4. Manual (M): Oh this is my favorite mode; any professional photographer would say this when asked by someone. If you want to have full control over the camera then manual mode is there, just turn it on. This mode enables you to manually set ISO, the shutter speed and the aperture (we’ll talk about ISO Shutter speed and aperture in our later post) independently of each other, referring either to the camera’s built-in meter or to a handheld meter. Professionals tend to use manual exposure and handheld light meters. This allows them to take multiple meter readings in various points of the subject frame. In this method the photographer has total control over the pictorial effects that various shutter speed and aperture Combinations can achieve.

Points to Remember:
Aperture priority AE (Av) - set the f-stop (Aperture) and the camera will adjust the shutter Speed. Use when-low light conditions, change f-stops too continuously.

• Shutter priority AE (Tv) - set the shutter speed, and the camera selects the f-stop (aperture), Use when-shooting action pictures like sports and wildlife.

• Program AE (P) - Camera sets shutter speed and aperture, Use when-shooting portrait, sports, landscape but always be careful

• Manual (M) - You set ISO, the shutter speed and the aperture, Use when- it’s your choice.


Enter your email address:


Delivered by FeedBurner